
A few weeks ago, Raquel from Horses and Heels, came to visit Rumor and I. One of the days that she was here we trailer over to a friend’s arena and rode. The intention was to go and be able to get out of the rain and have a dry place that wasn’t too muddy to do some flat work. Well sitting in the arena was a set of poles used for pole bending, so Raquel set them up and rode Rumor though them.
I had tried poles ONE time before and have been a little nervous about trying them again. It was super fun when I did it but it was a fun show, so it wasn’t like you had to be perfect or look great doing it. After watching Raquel do it with Rumor, I really wanted to try it with Gracie. So I did. O-M-G, it was as much fun as I remembered it to be and we only trotted through the set. I don’t think Gracie has ever even seen a set before too, so I know she didn’t know what to do and I just knew to weave through but I swear I think she enjoyed it as much as me. Not to mention, I learned that day that Rumor is AWESOME at poles! Raquel said it was one of her most favorite things to do on her. Who knew! I thought running barrels was.
Since that day I’ve been looking into getting a set but was shocked to see they would cost close to $300 for the poles plus the bases. I am a bargain shopper. There is now way I was going to pay $300 for a set and after talking to Raquel learned that I could make my own for much much cheaper! So that’s exactly what I did!
I made my own set for $40.
Here’s how you can make your own set too! As a note, the items that had to be purchased were bought from Lowes.
Items Needed:
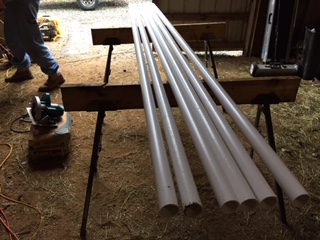
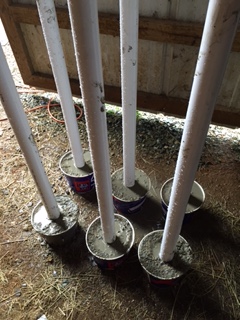
6 poles – I bought 10’ poles from lowes and cut them to be 7’ tall.
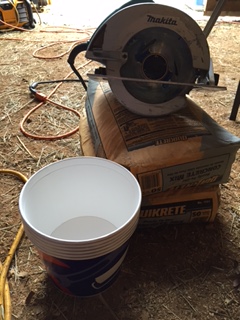
1 80lb Bag of Quickcrete
6 Paper Paint Buckets
1 bucket of water
Extra set of Hands
Steps to Make your Pole Bending Set:
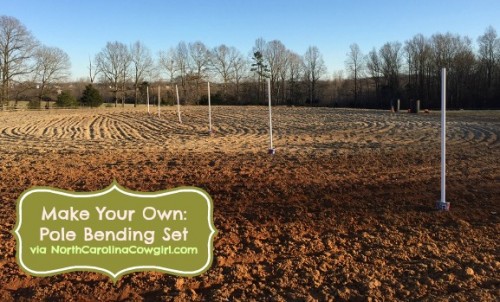
- Cut your 10’ poles down to the height you want. According to the National Pole Bending Association, poles shall be set on top of the ground, six feet in height, with no base more than 14 inches. I opted to do 7’ just because I wanted them a little taller.
- Set your paint buckets out in a row (where you want to leave them to set up because it will be hard to move them once you finish this step). One by one, get the person helping you to hold the pole in the center of the paint bucket and then fill it with the dry concrete mix till it is about ¾ full. Then grab your water and poor it on top of the concrete and use a stick to mix it together. You’ll want it to be a little soupy because once it’s mixed together good, add more dry concrete mix on top and then put a little more water on it until it looks like it’s soaking in good. Then mash it all down so it’s packed tight and the pole stays in place up right.

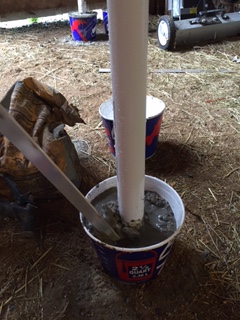
- Once each one is done, let them set up for at least 24 hours. I left mine alone for 72 just to give it added time to set up because I knew I wasn’t going to use them until this weekend.
After they’ve set up your good to move them into your arena and start practicing poles. The correct set up of them is to space each pole out in a line with 21ft from one pole to the next. Hope you enjoy!
Question for You
Have you ever competed or played around on poles before? What’s your fastest time?
Any of you ever made your own set as well to save money?
18 Comments
Brittany
January 13, 2015 at 2:01 pmI love doing poles. It gives my barrel horses a break from the same old stuff, but still works on basic fundamentals that transfer over to barrels. I wish I would have read this earlier…when we made our poles we just bought PVC pipe cut it down to size the bought traffic cones, cut the tops off, spray painted them black, and put the poles in them. I’m sure yours look way better!
Raquel
January 26, 2015 at 2:10 pmLove, love, love this : ) I had so much fun riding with you and doing poles!
Raquel recently posted..Mandarin Orange Green Tea
Joley
March 14, 2016 at 3:52 pmMy fastest pole run was probably a 29 in a small arena. I’m going to work on my horse this summer more on poles. I love these poles BTW!
NC Cowgirl
March 16, 2016 at 8:57 amThanks! They’ve worked great for me. However I will say they will blow over when it’s super windy, so a bigger base might be needed.
Judy Hughes
February 7, 2017 at 2:53 pmI am going to have a group of kids from the summer camp coming down to my place this summer for a month to practice on poles and barrels. They will be getting ready for the Rodeo that is at the end of each 2 weeks session. They will be doing polo cross on the land in front of me. I too was shocked at the price of a set of poles!!
Thank you so much for your suggestion on making your own poles I’m excited to try making them.
NC Cowgirl
February 14, 2017 at 7:21 amSounds like fun! I’m sure the kids will love it!
marsha Green
March 22, 2017 at 8:23 pmHi making my base out of a round oil pan ( from dollar store) , I think the weight of each should be about 6 to 8 pounds in weight.
Any thoughts on this point? Thanks
V
July 9, 2017 at 8:28 pmUm.. has anyone had any problems with horses cutting their feet or getting hurt on the concrete? That’s my only worry with this.
NC Cowgirl
July 13, 2017 at 8:55 amHi V, I have never had a problem with that and don’t know of anyone that has. Good question though.
RVL
September 14, 2017 at 7:55 amWe used an insert of pvc to fit the pole we were using that way we could remove the poles to store and pick up the base to move in the cart behind the 4wheeler. Works out great. DIY was totally the way to go for a big savings to practice.
Maddie
December 26, 2017 at 7:39 pmwhat size pvc pipes do you use?
NC Cowgirl
January 16, 2018 at 11:57 amI honestly don’t remember.
Leslie Jones
May 27, 2018 at 11:48 amI’ve made a similar thing with paint cans, pvc, and quickcrete to make holders for branches as decorations. The only addition I would suggest is to plant short pvc in the quickcrete that is just bigger than the poles but still snug. That way you can take the poles out, use the bales on the cans to put in a wagon or wheelbarrow, and cart it all off for storage. It’s one extra step for a lot more convenience.
Peter
January 16, 2019 at 5:40 amNice post, really amazing DIY work , thinking to try it out. Cost effective. Thanks for sharing.
Dee
June 28, 2019 at 1:41 pmMine keeps falling over
NC Cowgirl
October 25, 2019 at 7:35 pmHey Dee – I use T-post in the corners to keep mine from following over. Did you try that?
Shira
October 9, 2019 at 12:45 pmHi, i’m thinking of using heavy dirt/sand instead of concrete and fasten a piece of pvc that’s slightly bigger than my poles in the middle, do you think that would work well?
NC Cowgirl
October 25, 2019 at 7:30 pmSounds like a good idea to try out!